

Putting text on a arch or arc, on or in a circle is often asked so I will share some ways to accomplish this in Inkscape. I've used this method in 0.46 as well 0.48. I will assume you know very little about Inkscape, so you may want to skip through some of the explanations.
From the sidebar menu select the circle tool
and draw a circle. If you want it perfectly round use the control button. Then select the Text tool.
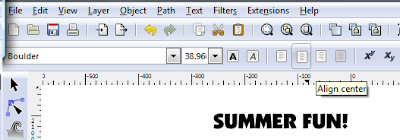
 and type your copy. While in the text mode check the tool bar above and select "Align center".
 You should have two elements like this...
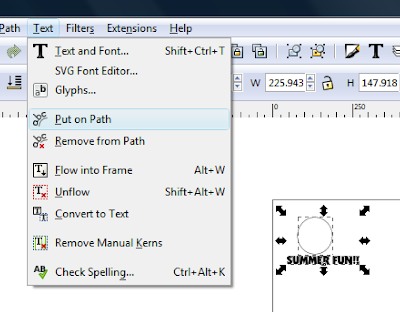
 Select both items and go to the Text drop down menu and select Put on Path.
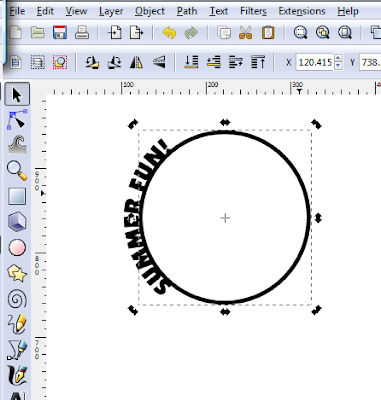
 Click twice on the circle only to get the rotating handles as shown, then use the control key and mouse to move it to the top.
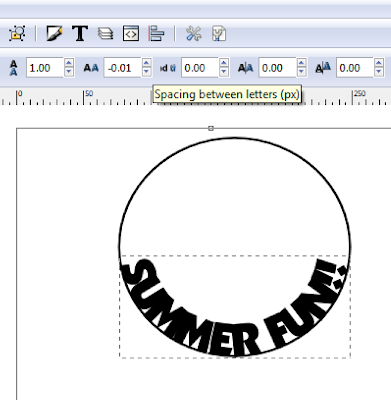
If you want the words at the bottom, select your circle and go to the icon above that will say "flip selected objects horizontally" when you mouse over it, select it and your text will flip over.

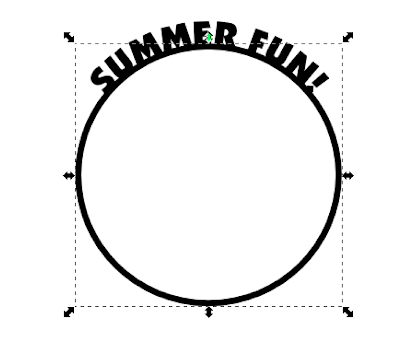
The next step is to click on your circle to get the rotating handles as shown here. I grab it and use the control button to turn the text to the bottom. Using the control keys moves it in controlled segments so it's easy to see when you have rotated 90 degrees (you will see the degree of movement at the bottom of your screen in Inkscape) though you can turn without using the control key, too.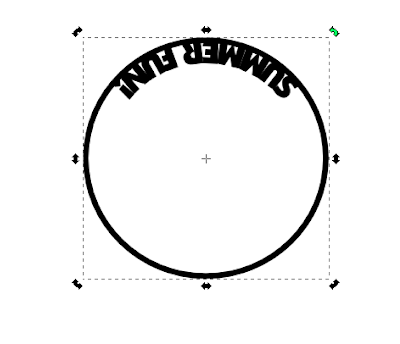

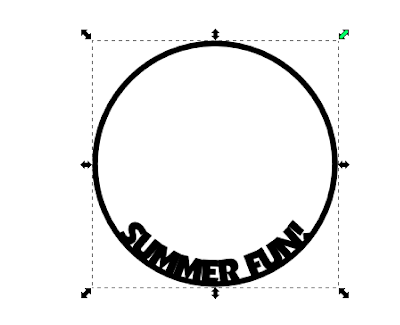
The second way to move the text (and you won't believe how easy it is!) is to simply grab the center arrow as higlighted here by the "E" and just pull it down. The only downside to this method is the integrity of your circle but it allows you to creat an oval shape, too.
You may also resize your circle for different effects and you can also adjust the size of your copy. Double click on it or use the text tool, then highlight and type in a new size until you like what you have.
You can also increase or decrease your space between the letters using the alt key and the right and left arrow keys. The arrow keys also allow you to move back and forth between the letters.


Moving the circle allows you to create an oval if you prefer...once you learn to use this feature you will find it to be a real time saver.
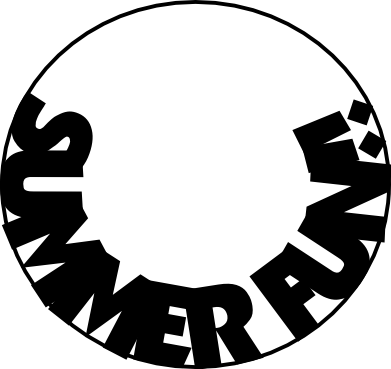
 To save the image for cutting purposes, I like to ctrl + d to duplicate the text, from the Path menu, select Object to Path and then follow the steps below...

In the same menu, select Break Apart

Now we need the hole back in the R so select both parts of the R and use the Difference

Now select all of the elements, and apply Union. Happy Cutting!

From the sidebar menu select the circle tool

and draw a circle. If you want it perfectly round use the control button. Then select the Text tool.
 and type your copy. While in the text mode check the tool bar above and select "Align center".
 You should have two elements like this...
 Select both items and go to the Text drop down menu and select Put on Path.
 Click twice on the circle only to get the rotating handles as shown, then use the control key and mouse to move it to the top.
If you want the words at the bottom, select your circle and go to the icon above that will say "flip selected objects horizontally" when you mouse over it, select it and your text will flip over.

The next step is to click on your circle to get the rotating handles as shown here. I grab it and use the control button to turn the text to the bottom. Using the control keys moves it in controlled segments so it's easy to see when you have rotated 90 degrees (you will see the degree of movement at the bottom of your screen in Inkscape) though you can turn without using the control key, too.


The second way to move the text (and you won't believe how easy it is!) is to simply grab the center arrow as higlighted here by the "E" and just pull it down. The only downside to this method is the integrity of your circle but it allows you to creat an oval shape, too.

You may also resize your circle for different effects and you can also adjust the size of your copy. Double click on it or use the text tool, then highlight and type in a new size until you like what you have.


You can also increase or decrease your space between the letters using the alt key and the right and left arrow keys. The arrow keys also allow you to move back and forth between the letters.


Moving the circle allows you to create an oval if you prefer...once you learn to use this feature you will find it to be a real time saver.
 To save the image for cutting purposes, I like to ctrl + d to duplicate the text, from the Path menu, select Object to Path and then follow the steps below...
In the same menu, select Break Apart

Now we need the hole back in the R so select both parts of the R and use the Difference

Now select all of the elements, and apply Union. Happy Cutting!

Very nice explanation Laura. I did purchase the Illustrator Cookbook and can't wait to get to it this summer. (stehman in PA)
ReplyDeleteLaura, just when I think I know something someone comes up with an even BETTER way. I learned a bunch from this....I'm still working through my copy of the book and have some neat things to post sometime soon ;)
ReplyDeleteThanks
So glad you could use the info! I'm enjoying the book, too! Look forward to more of your projects, Sue!
ReplyDeleteThis tutorial was very helpful for learning how to put text on a circle.
ReplyDeleteI'm so glad this post is still useful! 😊
DeleteCuma bila kita sudah tidak memerlukan lingkaran tersebut saat di delete lingkarannya kenapa ya kata yg sudah berbentuk lingkaran jadi terdelete juga? Mohon penjelasannya agar bila kita delete lingkaran kata yg sudah dibuat supaya ga ter delete.
ReplyDeleteI use ctrl + d to duplicate the text only, only drawing around the letters, not the whole circle.
DeleteThen from the Path menu, select Object to Path and then follow the steps below...In the same menu, select Break Apart. (Referencing my example above SUMMER FUN) Now we need the hole back in the R so select both parts of the R and use the Difference. Now select all of the elements, and apply Union.