
I've been exploring several options for paper curtains for dollhouses. The patterns are fun and diverse and it can be a fun way to create a new look. I decided to try to make a mini blind that could be pulled up and would hold in a variety of positions. So this is what I came up with and how I approached it. I thought I would share for others who might like to try it.


Basic tools I used for this project -
paper or cardstock, cotton crochet thread,
1/8" hole punch, scoring board and bone folder
for creasing, pencil, ruler tape, and patience!

I used a 3" x 12" strip and scored it at 1/2" intervals

Score lines

Accordian fold all the way up

At the bottom I measured in about 3/8" and a 1/4" from
the bottom to have a guide for punching my holes.


I use the first holes to mark the next and cut through two layers
and mark again. I do find it better to not punch too many
at once because the hole pattern doesn't always
fall quite in the center and I adjust to get it as close as possible.

Punch holes all the way except for the top one.

Cut off one long piece of crochet thread.


One continuous string, half up one side
and half up the other. From the bottom
I feed through the holes on both sides.

One additional step that I forgot to include.
Pull the string out of the top holes and put a layer
of invisible tape on the front and back of that section
and repunch your top hole on each side.
This will help reinforce where most
of the tension is felt when pulling the thread.

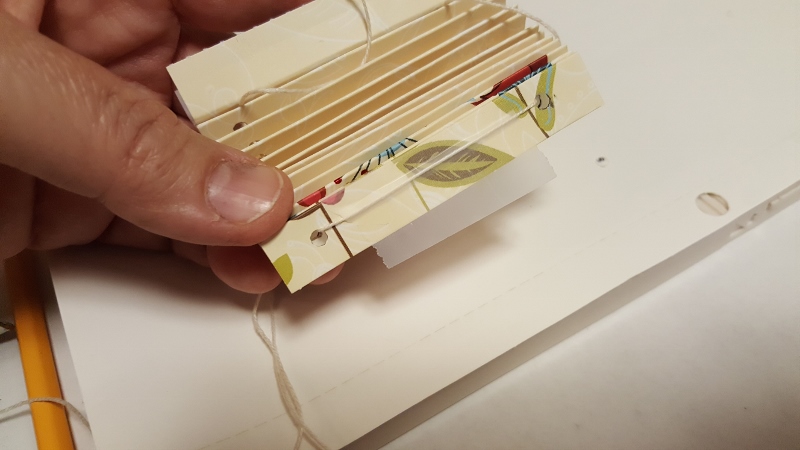
Now I cross each thread to the opposite top hole and pull it through.


Now your ends should be hanging out the front.

To test pull, I pinch together the top fold as shown.
You should be able to grab the strings
with your other hand and gently pull.

A small piece of double sided tape will be used.
I find Scotch tape most dependable.

See the little piece of tape in the center?
Make sure it isn't overlapping your holes.
This is only done on this one layer.

For additional strength, I use invisible tape
on the outside edges also taking care not to
overlap the holes. Then trim excess.

It should look like this.
Make sure you strings move easily.
Hold from the back like before to test movement.

The purpose of this is to create friction and
help your blind to hold wherever you want.
Tape the bottom where the string wraps
around so the thread does not shift.


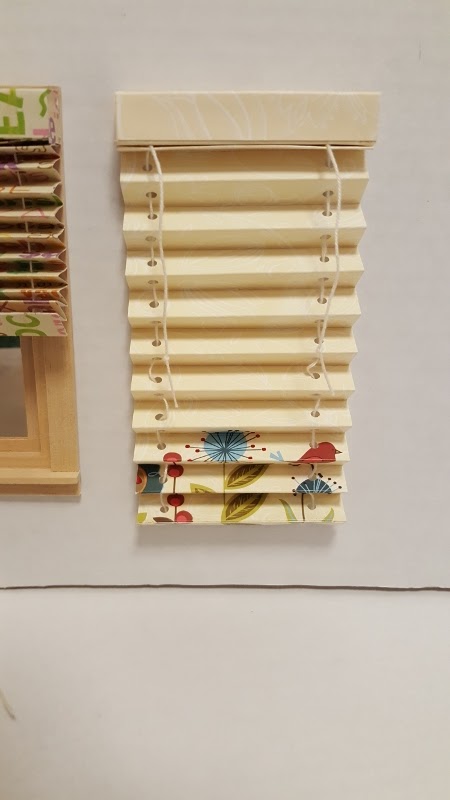
This one next to my first completed one!

Now I make the header using foam board though
some may prefer wood, whatever is handy and preferable.
I am creating a U-shape to have an opening
where my thread moves freely. The shorter ends
are about 3/8" high and glued to the front and back
at the top and the larger piece is glued on them.

I trimmed an edge because of where my holes were.
Wood edges would be thinner and less like to interfere.

My two shorter outer edges glued with clear tacky glue

Here is a side view of the U-shape.
This is the top of the blind.

I test to make sure no glue has seeped out
and glued my thread down.


I cut another 3" piece of my paper to cover the foam
on top and scored it and cover all three sides
meaning the front, top and back.
That leaves the open sides to cover.

I cut a 1/2" strip and glue it on and
then trim with my knife.
I do this mainly since it may
not be a square as I think, lol!

This last step is another piece of double sided tape to attach
the next fold to the top so it will hang correctly.
This is the view from the back. After adding that tape
I took additional invisible tape and taped across
the back of the header where you would attach
it to your wall or window to help protect the paper.
Also extended a small bit of tape around
the layer I used the double sided tape on
between the strings and on the
outer edges for reinforcement.

I had another sheet of this paper so I cut
out the matching part and glued it to
the bottom of my blind to cover the string.

Side view


I had not cut my thread yet so extra long but
when your blind is pulled up you may
want to guide it to one side.
I gently push it in near the
top slat to hold it off to the side.


When you trim your threads, pull it out all the
way to make sure you have enough length.
I tied tiny knots where I thought I wanted
the length to be and then cut off the excess.
Have fun creating your own special look!