Tuesday, September 29, 2009

Baby Onsie Favor box


I saw these beautiful onesie favor boxes and played in Inkscape to create my own svg using a onsie card template posted in the Craft Edge forum for a starting point...and I'm still working on some details...but thought I'd share this for now...I also used my cuttlebug to emboss the little bib area on the front.

Sunday, September 27, 2009

Working with a photo in Inkscape


My last post showed a silhouette I created using a photograph in Inkscape and made an svg file. I will try to outline the steps I took to do this...there are perhaps easier ways but this is how I proceeded.

Update-(2/2/2011) A reminder...this was done in Inkscape 0.46 so if you have a newer version there may be some variances in the menu...a great forum available for Inkscape tutorials is Inkscape Cutting Design


Dad edits
After importing the photo, select your image,(it will have little arrows around it) by clicking on it or using the select pointer from the sidebar. From the Path drop down menu select 'Trace Bitmap' .


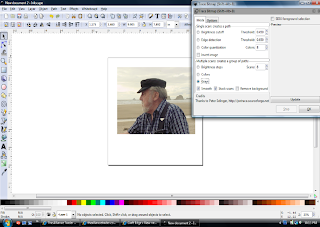
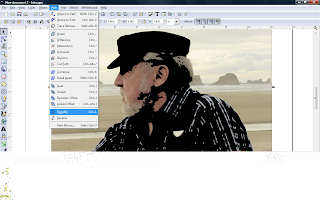
In the trace bitmap window, I select 'Grays' (though you may prefer colors) from the Mode menu under Multiple scans. Mine defaults at 8 scans. I leave it there and select 'Update'. The image will appear in the small preview window. Then, select 'OK'. Your photo will change to a grayscale image. (I then click on the red X to close the trace window).


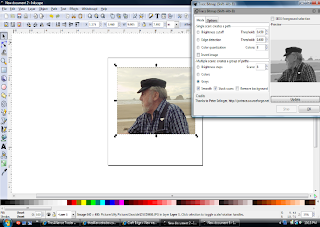
Select the image, the go to the 'Objects' menu and select 'Ungroup'. A box will appear around each layer of scans, 8 in total.
more dad edits
Click outside the image and then back on the image and you can select the individual scans. I separated them and deleted all except one that I felt would work best.


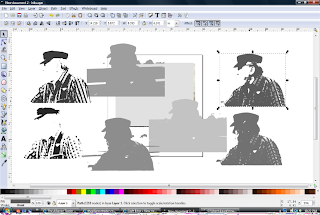
I turned the saved scan black.

I overlay the picture to use as a reference but at this point I also use the 'Simplify' from the Path menu

As noted below this greatly reduces the number of excess nodes in my image (you can 'Undo' from the Edit menu if you don't like the results)


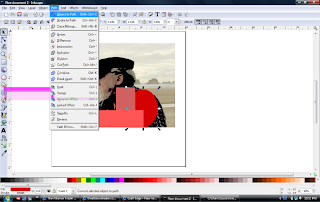
I'm not interested in having all the detail from the shirt so I draw circles and squares (from sidebar menu) to block the excess nodes anc create and more solid image. From the Path menu I select 'Object to Path' to convert the shapes to a path. (You can select them all at once or individually).


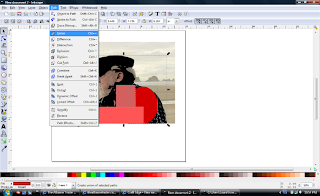
Here I select all the elements including my black photo scan and from the Path menu, select 'Union' which will unite all the elements into one unit that you can further edit. All the elements turn black.

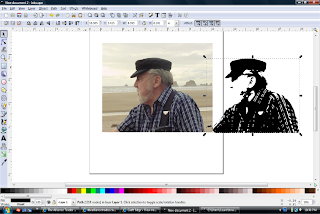
Here I select the 'Draw Freehand lines' tool from the sidebar.
Dad again

I magnify the image and draw in the areas I want to give more definition (which is why the original photo is still there) and areas in the shirt that still need to be made solid. I could have just drawn a freehand box around the shirt rather than bother with the boxes and circles in the earlier step, too. This shot show the main black image in the 'Edit node' mode so I can see how many excess nodes will be eliminated once I add these elements. As before, I select all of the elements, go to the Path menu and select 'Union' and I get a single image that I can continue delete or move nodes on until I'm satisfied with the image.
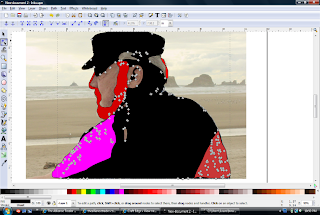
In this image, I still have some nodes to delete and some to move to complete my image.

The finished product! Svg file here.


It's not as complicated as it may seem at first. This particular image had a lot of excess detail in the shirt. You can also experiment with the some of the options in the trace bitmap pop-up box to edit details...have fun! Inkscape is a great program!


Monday, September 21, 2009

Ships Ahoy!

I had this favorite photo of my Dad from a trip to Canon Beach in Oregon a couple of years ago, so I thought I'd work with it in Inkscape to create a svg file...which I'll share, too. I thought he looked like a sea captain and so smart in his cap and I wanted a profile shot which was perfect to work with. After playing with some trace bitmap settings, I also find it helpful to use the "simplify" from the Path menu to get rid of excess nodes. You can always undo if you don't like the results. I used it twice for this image and then added a few lines using the freehand line tool.


I cut these images below with the copy added in scal.


Svg file here!

How I created this silhouette

Sunday, September 20, 2009

Build-a-Flower Earring

I don't know why I feel compelled to do different things with the Build-a-Flower Cuttlebug die and embossing kit...did fish in an earlier post...now I'm playing around with earrings...so here's what I have at the moment...still tweaking a little but wanted to share anyway.

Start here with the plain die cuts


Chose from the many embossing options...


I decide to make these reversible instead of two separate earrings...I'm having a little too much fun with these dies! Give 'em a try!

Heart Spinner


I just cut this out in SCAL 1...the file is here at Extreme Cards and Papercrafting: "Sure Cuts A Lot" Files from PDF Files [Update] If you're a fan of 3d work this is a site to bookmark! It's inspiring and fun! Enjoy!

Monday, September 14, 2009

Deco Pendant


This is the same pendant/bookmark as in the last post.
Just some optional ideas. The blue one is missing some parts because the paper was not as strong as the green stock. Certain card stock colors seem to be a little problematic with finer details but I love some of the rich colors.
Designed in Inkscape. When I cut it in SCAL I used the normal mode for the main design and the blackout mode for the color underneath so I would have a solid cut. Will upload files later to my wearable art link...


With the large "F" I tried cutting the word friends just above but my paper wasn't cooperating so I decided to delete that part and decided I would either print an insert that said "Friends" or put in some other decorative element. I do have a nice friendship stamp that barely fit the size I cut but offered me the option of adding a sentiment that way, too.

Tuesday, September 1, 2009

Pendant or bookmark?

Okay, you decide...I thought it could perhaps serve a dual purpose and could even be reversible, too!

This design is something I discussed in an earlier post called Name Play where I took my name (shown here in Edwardian Script) and mirrored the image and put it on end so it's not so obvious at first that it's a name.


Here, I thought I'd try making a pair of earrings. The design leaves a little loop so it would easy to slip a little wire in to attach it.


I added some small pieces of thin magnetic sheeting
to hold it together which is great for
holding your place in a book!


Link in Wearable Art link

Wearable Art - More Earrings


I couldn't resist trying a few different colors. Above is a finished pair of earrings. I used some prefab flowers with a little jewel in the center. I also used my cuttlebug to add more texture I took the pics below before I glazed them.

I found a pack of inexpensive earring posts that I can use to attach my paper creations...one advantage to these is that they are very light...I find I want to go through the closet to see what might match my many beautiful papers...I'll have to start carrying my paper samples with me when I shop!