Thursday, December 29, 2011

Personalized Balloons


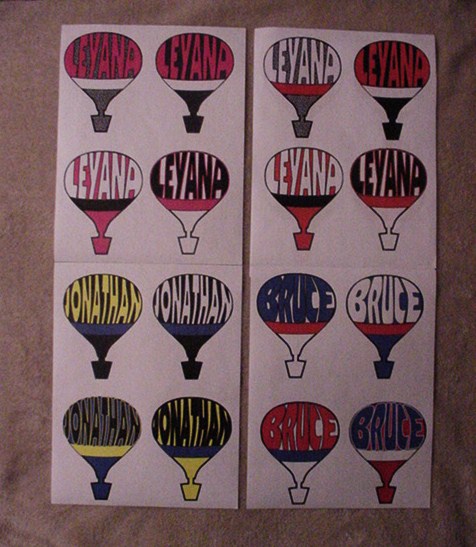
Just a little twist on the balloons I've posted earlier. I thought it would be fun to personalize them by using the Envelope Deformation in the Path Editor menu. I created a slightly curved band to give me a stopping point for my words. I used a font called Boulder because it's bold typeface and would conform to the shape easier. In order to use the Path Editor you will need to convert it to a path. Then in the Path Menu, as shown in the illustration, you will find the Path Effects Editor near the bottom. Click it open and the Effect menu will appear. There are a variety of options. Make sure you have your word selected and the click open the Envelope Deformation effect. I mainly use the Top Bend Path and Bottom Bend Path. The right and left manipulations can quickly distort the letters. After you are happy with the lettering, select object to path to save your changes before you close the path effects menu.


I do some additional editing and you can tweak some areas to suit. I prefer to edit the end letters with the node editor and shape them to the sides of the balloon. I've also used a variety of the patterns available as a fill for some of the backgrounds.


For some of you this could be a great Print and Cut project. I thought, for others, it could a fun project with kids, too, letting them cut out and paste together their own personalized balloon. I use rubber cement because it gives a little time to align the edges of the balloons.


Have fun!


Sunday, December 25, 2011

2012 Calendar - January

I'm using Inkscape 0.48 feature in the Extensions drop-down menu for creating calendars. It gives you a simple basic start for creating your own custom calendar. You can create a one page calendar for the year or individual months. So, I thought I'd try to have fun and create a different look for each month and play with fonts, shapes and textures. The purple rectangle is created from the Filters drop-down menu under Materials - Enameled Jewelry. I added a variety of rectangles and circles until I was happy with it. So this is first installment for the new year, soon to be here!

Sunday, December 18, 2011

Name Game - part 2

Just a quick visual with some simple options. I used the Boulder font for the background and the line spacing was adjusted to 50% in the top right sample. The next one below the line space is 80%. I think the first one gives a more abstract and less obvious use of the name. The next two samples are the same designs with the background shape of the letter added in black and the text changed to white.

Saturday, December 17, 2011

Name Game


A little more designing using the Path/Intersection feature of Inkscape as described in the last post...here are some ideas to create a personalized look. While these are for towns you could easily do it with someone's name, too.

Friday, December 16, 2011

Subway Art


Well, I was inspired by some work I've seen for other cities so had to do my own take for our little town. Naturally I did my work in Inkscape. Most of it was just deciding placement and tones. I did decide to overlay a large "a" with the city, state and county names as the background.

In the sample here I've typed the background rotating the city and state. I also kept reducing the size and I adjusted the line spacing to 80% in the text editor. I duplicated about three times and then when I had enough copy for my "a" I selected Object to Path and Union to make them one unit. The "a" as you can see I set translucent enough to play with my placement then I, strangely enough had to Ungroup it in order to convert it with Object to Path. After both elements were path I selected both and using the Intersection feature in the Path menu.


Not sure why a couple of letters dropped out of the design...but not too hard to fill in...give it a try!

Thursday, December 8, 2011

Whoo Loves Swirls?


I was at Inkscape Cutting Design and saw Carolyn's tutorial on making shapes with spiral so it inspired me to create some swirl patterns and make these owl designs I'm sure there will be more to come!


Wednesday, November 23, 2011

Hanging Balloon Mobiles and Pink Star set

After receiving a request, it got me in gear to finally put these together. I used a purse handle for the framework and some gold-colored thread for hanging.


Another layered star set...


Thursday, November 17, 2011

Faux Door Knob Plate


I noticed in someone's home a door knob plate had been added to a bedroom door complete with skeleton key hole and it seemed to add a simple charming touch so it sparked the idea for this file (doesn't take much for me!) so perhaps this will give you some fun ideas to run with, too!

The sample on the left is the basic shape (minus the monogram) provided in my zip file, one with the keyhole and one without. The rectangular sample was something I did in Inkscape just to inspire some other options.

After cutting samples, I embossed them with my Cuttlebug and then added a bronze ink.

I wanted to use one in my office on the outside of the bathroom door in the so I took the door knob off, found the center of my paper and decided approximately where I wanted to put it. I held the sample to the hole on the door so I could poke the in the center (with my screwdriver) then slipped it over the knob hardware and pressed it gently to get an impression for the area to be cut away. The size of my plate is 3 1/2" x 9". I glue it on with rubber cement.


It could be fun to make a space just for an initial or name at the bottom, too. Have fun! The link is here!

Thursday, October 20, 2011

Onsie Favor Box - modified


This design was based on a request a few months ago. I was asked about creating a larger base approximately 2 inch square for extra goodies. I found the mini size paper cups worked well.

The file is now available where the other onsies are located. You'll have to scroll down to the last post for it which is about the thirteenth. File link here!

Teo shared a photo of hers which is included and I love seeing pics so please send them along! Thanks, Teo!

The little flowers are from a Martha Stewart punch.
It makes it easy to utilize my paper and be all matchy-matchy!
I squeezed 2 up by using the "keep proportions" box and setting the height to 10.8" in my scal program.

Teo's onsies are below. She emailed and told me she made fifty! She said, "They were the perfect size for 4 pieces of Fannie Mae Mint Meltaways in their own little paper cups, and they were a big hit!"

Monday, October 3, 2011

Layered Dimensional Stars

These sets show some possibilities for layering stars for a fun and unique look! Some are full stars layered and some are cutouts which allow the paper underneath to show through. Doing that extends the use of your paper.

I have found I prefer to separately fold the layers instead of gluing them and then doing one fold. One advantage is that you can move your elements around until your happy with the look. Another is that if you have not glued the star on centered correctly, that will show up when you go to folding it...so I glue at the end when I've chose placements of colors...hope this will inspire you to create some fun color and pattern combinations!


An earlier post show how to fold the stars for a more dimensional looks check my "stars" Label to find those posts...have fun!